Overcoming limitations or performance bottlenecks by executing raw SQL with Dapper
Nowadays it is extremely rare to implement an application without using any sort of library for Object-Relational Mapping (ORM) to reduce development time by removing the need to implement a lot of boilerplate code to access a database. In the .NET world that usually means using Entity Framework Core or NHibernate both offering strong tooling for CRUD operations, data type conversions, strong typed queries using LINQ with IQueryable and so on.
Despite the pros of using an ORM there are also some cons that, while may not prevent them to be widely used inside an application, they may need to be replaced in some areas either for performance reasons or limitations. This usually means working directly with ADO.NET (oh hell no!) or use Micro ORM libraries, like Dapper, that are focused on performance and providing a simpler way to map database queries into objects.
In this article I’m going to demonstrate how Dapper can easily be integrated with Entity Framework Core (and probably with any other ORM) without using TransactionScope, while trying to keep the same contracts via extension methods to DbContext instances and ensuring the SQL is properly logged in a similar way to what EF Core usually does.
Dapper Requirements
To work with Dapper, the only requirements are a DbConnection, the SQL text, and some optional parameters, like a DbTransaction, command timeout, query parameters and so on. Sometimes is is also necessary to globally register some custom TypeHandler<T> for the when it can’t convert a given database type to its CLR representation.
Assuming we want to execute a simple SELECT @SomeParameter statement via Dapper, what code we must implement to get everything we need from a DbContext?
// get the underline DbConnection
var connection = context.Database.GetDbConnection();

// get the underline DbTransaction, if any
var transaction = context.Database.CurrentTransaction?.GetDbTransaction();

// get the currently configured command timeout
var commandTimeout = context.Database.GetCommandTimeout();

// create a Dapper CommandDefinition
var command = new CommandDefinition(
    "SELECT @SomeParameter",
    new
    {
        SomeParameter = 1
    },
    transaction,
    commandTimeout,
    cancellationToken: ct
);

var _ = await connection.QueryAsync<int>(command);
As shown, the database facade has everything we need to make Dapper work but there is a caveat that must be properly addressed:
Dapper always executes the SQL immediately into the database, which means it won’t detect changes made on tracked entities before SaveChanges is invoked and it won’t wait to flush changes either, so be very careful when managing database access.
My recommendation is to always open a transaction explicitly via context.Database.BeginTransactionAsync before running any mutation.
Since the objective of this article is to show how Dapper can be integrated with Entity Framework Core, we are going to create a simple endpoint to manage products:
GET /products — lists products, including their current price and last date when it has changed;
POST /products — creates a product with a given price;
The Database Model
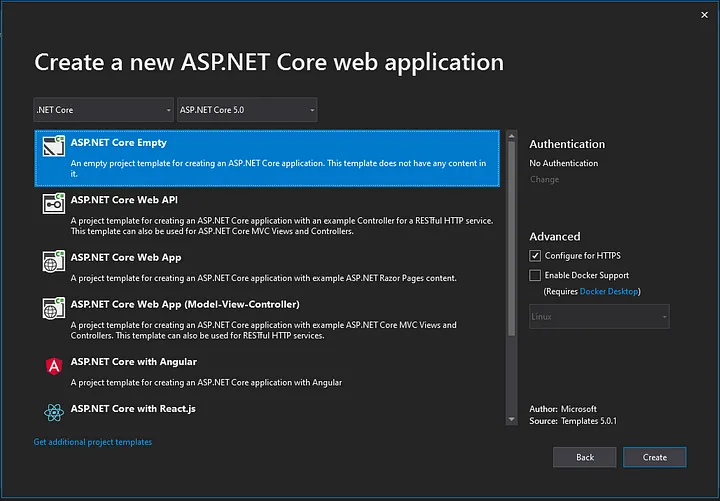
We need a SQL database to run our queries so, to simplify our setup, we are going to use the SQLite provider for Entity Framework Core and configure it as an in-memory instance.
Install the Nuget Microsoft.EntityFrameworkCore.Sqlite:
Create a Database folder and inside create entities for products and price history, both mapped into an Entity Framework context:
Open the Startup.cs file and add the database context to the container. Because the database is stored in-memory, we must ensure all tables are created when the application starts and at least one connection is always open so the SQLite provider won’t discard it from memory:
publicvoidConfigure(IApplicationBuilder app) { // this ensures at least one connection is open and the database is kept in-memory while the application is running _keepAliveConnection = new SqliteConnection(ConnectionString); keepAliveConnection.Open();
using (var scope = app.ApplicationServices.GetRequiredService<IServiceScopeFactory>().CreateScope()) { var ctx = scope.ServiceProvider.GetRequiredService<ApiDbContext>(); ctx.Database.EnsureCreated(); }
// ... } }
The Products Controller
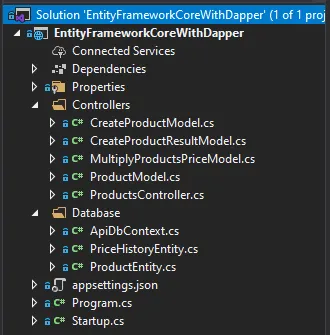
Now that we have configured the database, create a Controllers folder, the ProductsController class and its models. For now, we are going to implement our logic using only the Entity Framework context.
publicclassCreateProductResultModel { public Guid Id { get; set; } }
Right now, the project content should look as follows:
Dapper Integration
Now that we have a running API that manages products and their prices using Entity Framework Core, we can now integrate Dapper into the solution and apply what we learned at the start of this article.
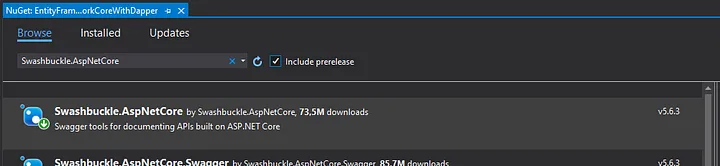
Install the Nuget Dapper:
Since Dapper uses extension methods over IDbConnection and we can extract everything needed from a DbContext instance (even an ILogger to log our raw SQL), lets keep that philosophy and replicate those extension methods but this time to an Entity Framework Core context.
Inside the Database folder create a static DapperDbContextExtensions class, that will containing all the extension methods, and a DapperEFCoreCommand structure, used to wrap both logging and Dapper’s CommandDefinition.
For demo purposes we are only going to expose methods to query a collection of items and to execute commands but feel free to add your owns (like FirstAsync). I also put the CancellationToken at the start since all other parameters are optional and I have my fair share of cancellation tokens being passed as the object parameters, but change them in a way that makes more sense to you.
var transaction = context.Database.CurrentTransaction?.GetDbTransaction(); var commandType = type ?? CommandType.Text; var commandTimeout = timeout ?? context.Database.GetCommandTimeout() ?? 30;
Since we are using Guid properties in our models but they are stored as TEXT and Dapper doesn’t know how to do the conversion when reading from a SQLite database, we also need to add a global type handler.
Open the Startup.cs file, create an inner class GuidTypeHandler, that will parse the string into a Guid, and register the handler on application startup:
As stated before, Entity Framework will usually make it easier to access the database and remove some of the boilerplate code but, like most advanced frameworks, it has some drawbacks, specially performance degradation that sometimes can’t be ignored in critical paths.
Lets analyse each endpoint and see if we can improve both the generated SQL and the total of database interactions.
POST /products
This endpoint is responsible to create a product with a given initial price. Because prices are stored in a history table, being the most recent entry the current product price, this action has to insert both a line in the products and price history tables.
If we look at the logs we can see two commands being executed by the Entity Framework with a total of four operations:
1
2
3
4
5
6
7
8
9
10
11
12
13
14
info: Microsoft.EntityFrameworkCore.Database.Command[20101]
      Executed DbCommand (6ms) [Parameters=[@p0='?' (Size = 8), @p1='?', @p2='?' (Size = 16)], CommandType='Text', CommandTimeout='30']
      INSERT INTO "Product" ("Code", "ExternalId", "Name")
      VALUES (@p0, @p1, @p2);
      SELECT "Id"
      FROM "Product"
      WHERE changes() = 1 AND "rowid" = last_insert_rowid();
info: Microsoft.EntityFrameworkCore.Database.Command[20101]
      Executed DbCommand (1ms) [Parameters=[@p3='?', @p4='?', @p5='?'], CommandType='Text', CommandTimeout='30']
      INSERT INTO "PriceHistory" ("CreatedOn", "Price", "ProductId")
      VALUES (@p3, @p4, @p5);
      SELECT "Id"
      FROM "PriceHistory"
      WHERE changes() = 1 AND "rowid" = last_insert_rowid();
This happens because Entity Framework and the SQLite provider don’t know what our code needs from each entity after an insert, so the only option is to execute a command that does the insert, selects database generated columns, and update properties of the tracked instances, in this case, the primary keys.
Since we know our code doesn’t need anything from the database, because we are only returning the product external id that was calculated inside the controller, we can execute a single SQL statement containing both inserts:
1
2
3
4
5
6
7
INSERT INTO Product (ExternalId, Code, Name)
VALUES (@ExternalId, @Code, @Name);
INSERT INTO PriceHistory (Price, CreatedOn, ProductId)
SELECT @Price, @CreatedOn, Id
FROM Product
WHERE
    rowid = last_insert_rowid();
Change the CreateAsync action to use the extension method ExecuteAsync with this statement, passing the arguments. Keep in mind that SQLite is case sensitive when parsing the parameter name, so you must ensure the anonymous object property names match with the ones inside the statement:
await _context.ExecuteAsync(ct, @" INSERT INTO Product (ExternalId, Code, Name) VALUES (@ExternalId, @Code, @Name); INSERT INTO PriceHistory (Price, CreatedOn, ProductId) SELECT @Price, @CreatedOn, Id FROM Product WHERE rowid = last_insert_rowid();", new { ExternalId = externalId, model.Code, model.Name, model.Price, CreatedOn = DateTime.UtcNow }); await tx.CommitAsync(ct);
returnnew CreateProductResultModel { Id = externalId }; }
// ... }
Remember that, even if we are executing a single command in the database, it contains two instructions so it still must be wrapped by an explicit database transaction.
When creating a new product using the Swagger UI endpoint (https://localhost:44310/swagger/index.html), if you look at your Visual Studio output console, a log similar to the following should appear showing the custom SQL:
dbug: EntityFrameworkCoreWithDapper.Database.DapperEFCoreCommand[0]
      Executing DbCommand [CommandType='Text', CommandTimeout='30']

      INSERT INTO Product (ExternalId, Code, Name)
      VALUES (@ExternalId, @Code, @Name);

      INSERT INTO PriceHistory (Price, CreatedOn, ProductId)
      SELECT @Price, @CreatedOn, Id
      FROM Product
      WHERE
          rowid = last_insert_rowid();
info: EntityFrameworkCoreWithDapper.Database.DapperEFCoreCommand[0]
      Executed DbCommand [CommandType='Text', CommandTimeout='30']

      INSERT INTO Product (ExternalId, Code, Name)
      VALUES (@ExternalId, @Code, @Name);

      INSERT INTO PriceHistory (Price, CreatedOn, ProductId)
      SELECT @Price, @CreatedOn, Id
      FROM Product
      WHERE
          rowid = last_insert_rowid();
GET /products
This endpoint is responsible for returning a paginated collections of products with their current price and the timestamp when it was last updated, ordered by product code.
Lets extract the SQL statement generated by the Entity Framework Core from the logs:
1
2
3
4
5
6
7
8
9
10
11
12
13
14
15
16
info: Microsoft.EntityFrameworkCore.Database.Command[20101]
      Executed DbCommand (3ms) [Parameters=[@__p_1='?', @__p_0='?'], CommandType='Text', CommandTimeout='30']
      SELECT "p1"."ExternalId" AS "Id", "p1"."Code", "p1"."Name", (
          SELECT "p"."Price"
          FROM "PriceHistory" AS "p"
          WHERE "p1"."Id" = "p"."ProductId"
          ORDER BY "p"."CreatedOn" DESC
          LIMIT 1) AS "Price", (
          SELECT "p0"."CreatedOn"
          FROM "PriceHistory" AS "p0"
          WHERE "p1"."Id" = "p0"."ProductId"
          ORDER BY "p0"."CreatedOn" DESC
          LIMIT 1) AS "PriceChangedOn"
      FROM "Product" AS "p1"
      ORDER BY "p1"."Code"
      LIMIT @__p_1 OFFSET @__p_0
As we can see, because we need both the Price and CreatedOn columns from the most recent price history entry, the SQLite provider decided to create two sub-queries. The database engine is relatively smart to know how to optimize them but lets ensure the engine optimizes the access as follows:
1. order products by code
2. filter products by skip and take
3. join with latest price history entry, grouped by product, using the ROWID for fast access

SELECT p.ExternalId as Id, p.Code, p.Name, lph.Price, lph.CreatedOn as PriceChangedOn
FROM (
    SELECT Id, ExternalId, Code, Name, RowId
    FROM Product
    ORDER BY Code DESC
    LIMIT @Take OFFSET @Skip
) p
INNER JOIN (
    SELECT ph.ProductId, ph.Price, ph.CreatedOn
    FROM PriceHistory ph
    INNER JOIN (
        SELECT MAX(RowId) RowId
        FROM PriceHistory
        GROUP BY ProductId
    ) phLatest ON ph.RowId = phLatest.RowId
) lph ON p.Id = lph.ProductId
Note: this may not be the most optimized access but remember, this is for demo purposes.
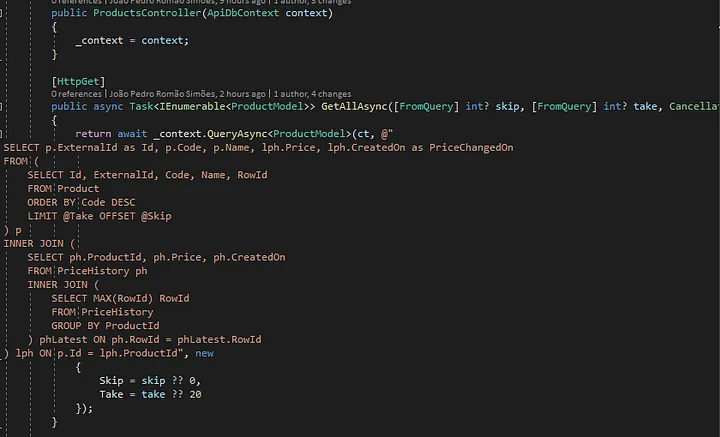
Change the GetAllAsync action to use the QueryAsync<T> extension method, passing this SQL and both the skip and take as arguments.
[HttpGet] publicasyncTask<IEnumerable<ProductModel>> GetAllAsync([FromQuery] int? skip, [FromQuery] int? take, CancellationToken ct) { returnawait _context.QueryAsync<ProductModel>(ct, @" SELECT p.ExternalId as Id, p.Code, p.Name, lph.Price, lph.CreatedOn as PriceChangedOn FROM ( SELECT Id, ExternalId, Code, Name, RowId FROM Product ORDER BY Code DESC LIMIT @Take OFFSET @Skip ) p INNER JOIN ( SELECT ph.ProductId, ph.Price, ph.CreatedOn FROM PriceHistory ph INNER JOIN ( SELECT MAX(RowId) RowId FROM PriceHistory GROUP BY ProductId ) phLatest ON ph.RowId = phLatest.RowId ) lph ON p.Id = lph.ProductId", new { Skip = skip ?? 0, Take = take ?? 20 }); }
// ... }
Because we globally registered our GuidTypeHandler, Dapper will know how to convert the column ExternalId [TEXT] as a Guid so we can map our result directly as a ProductModel type.
Once again, if you invoke the endpoint using the Swagger UI, the folowing log should be visible:
dbug: EntityFrameworkCoreWithDapper.Database.DapperEFCoreCommand[0]
      Executing DbCommand [CommandType='Text', CommandTimeout='30']

      SELECT p.ExternalId as Id, p.Code, p.Name, lph.Price, lph.CreatedOn as PriceChangedOn
      FROM (
          SELECT Id, ExternalId, Code, Name, RowId
          FROM Product
          ORDER BY Code DESC
          LIMIT @Take OFFSET @Skip
      ) p
      INNER JOIN (
          SELECT ph.ProductId, ph.Price, ph.CreatedOn
          FROM PriceHistory ph
          INNER JOIN (
              SELECT MAX(RowId) RowId
              FROM PriceHistory
              GROUP BY ProductId
          ) phLatest ON ph.RowId = phLatest.RowId
      ) lph ON p.Id = lph.ProductId
info: EntityFrameworkCoreWithDapper.Database.DapperEFCoreCommand[0]
      Executed DbCommand [CommandType='Text', CommandTimeout='30']

      SELECT p.ExternalId as Id, p.Code, p.Name, lph.Price, lph.CreatedOn as PriceChangedOn
      FROM (
          SELECT Id, ExternalId, Code, Name, RowId
          FROM Product
          ORDER BY Code DESC
          LIMIT @Take OFFSET @Skip
      ) p
      INNER JOIN (
          SELECT ph.ProductId, ph.Price, ph.CreatedOn
          FROM PriceHistory ph
          INNER JOIN (
              SELECT MAX(RowId) RowId
              FROM PriceHistory
              GROUP BY ProductId
          ) phLatest ON ph.RowId = phLatest.RowId
      ) lph ON p.Id = lph.ProductId
Conclusion
I hope this article gave you a good idea on how to easily integrate Dapper with Entity Framework Core, either to optimize critical paths or to workaround limitations while removing the need to use TransactionScope, usually needed for these use cases.
Remember that I only implemented a few set of operations, but feel free to extend your own, like FirstOrDefaultAsync, SingleAsync and even their synchronous operations.
As an extended note, this approach can also be easily applied to any other ORM, like NHibernate, as long you can access the underline DbConnection and current DbTransaction from the context.