
Most .NET developers either have used Entity Framework Core or eventually will, because it is one of the most known and flexible ORM frameworks to access databases in the .NET ecosystem, directly supported by Microsoft and the Open Source community.
In this article I’m going to explain how you can create a console application that will check if migrations are missing from the database and apply them accordingly. This is an approach I’ve been using ever since Microsoft released .NET Core 1 RC 1 (at the time I even created an open-source library to facilitate console hosting, now deprecated because we can use Microsoft.Extensions.Hosting).
Ever since its inception, one of the main features supported by Entity Framework is the concept of database migrations in code-first scenarios which, in a simplified way, work as follows:
- Model entities representing tables are mapped into the
DbContext, were table and column names, data sizes, foreign keys, indexes, and so on, are defined; - Entity Framework tools are installed into the project (either the .NET Core CLI tools for cross platform or Package Manager Console tools for Visual Studio integration);
- A class implementing
IDesignTimeDbContextFactoryis created and will configure theDbContextwhen Entity Framework tools are run — provider to use, connection string, etc. This reduces the number of parameters that need to be passed when using the CLI/PMC tools. - When adding a new migration, the tools are going to use the factory to create the
DbContext, compare the mappings to the current database schema, see what’s different and create a migration class with a bunch of C# operations that will change the schema accordingly (like creating a new index, adding a new column, dropping a table). The migration will also have a method for the inverse operations (drop the index, remove the column, recreate the table) that can be used to revert changes; - The tools can also be run to update the database schema, either to the most recent or revert to an older version, ensuring missing migrations are run sequentially in the required order.
This is a very powerful feature offered by EF Core because it speeds up the development and evolution of the database schemas while ensuring a historic change log is kept and version controlled near the C# entity models. The application may have been developed for 10 years but any new team member can setup a local version of the database in just a few steps.
But you are probably thinking: this seems nice and all, but he’s talking about DevOps and I’m not sure how I can use this to evolve my production schemas? The company I work for does not allow any developer to connect to production databases and even if it did, certainly the user wouldn’t have permissions to change the database schema! I can’t run EF Core tools from my computer to do this!
Why an installer for EF Core migrations?
Having a console application that applies migrations to a database has some advantages that will probably benefit the DevOps process your company currently implements:
- For cloud solutions, you can add steps into the Continuous Delivery pipeline that run the console before distributing the APIs or Websites, which may even require the approval of specific DevOps team members. Because the pipeline is tightly controlled, the production connection strings that can execute DDL instructions are properly secured. Even if you don’t have a DevOps team but the access to production is secured by the Infrastructure team, the console can be provided as a standalone executable and they decide how and where it should be run, manually or not.
- For on-prem solutions, the console can be packed with the application installer to be run every time a new version is released. If it fails, the installation process can either be halted or database changes reverted to a previous state by restoring a backup made at the start of the installation.
In both scenarios this process is more reliable than, lets say, executing SQL scripts which are harder to read, maintain and debug in case of problems. If the console application has been configured with a good logging library (either to a file or command line output) there’s no reason someone can’t analyze what is happening.
The use case scenario
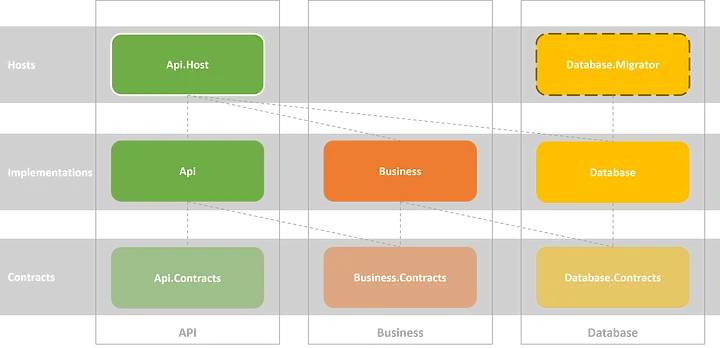
To keep things simple and focusing in the migrations executable, let’s assume we are maintaining an API that manages a warehouse. This API is responsible for storing product information and stock movements and is implemented using a typical three-layer architecture, using Entity Framework Core to store and retrieve data from a SQL Server database.
In this hypothetical scenario, we decided to improve our DevOps process by creating a console application to apply migrations into the database. This tool will be called migrator, which is a new console project inside the database layer.
It will have a direct dependency from the database implementation, which holds the Entity Framework Core mappings for the database entities, defined in the database contracts layer.
The diagram for projects and their dependencies inside the solution, after creating the migrator executable project, could look like this:
Since this API only manages products and stock movements, the database model could be represented by the following entity contracts (navigation properties won’t be used for simplicity):
1 | public class ProductEntity |
The Entity Framework Core database context could be mapped as follows:
1 | .HasMaxLength(8); |
As I said before, nothing fancy here, just a simple use-case with a database model we will use for creating our migrations and apply them using our console application.
I have a working example showcasing this scenario on GitHub (only the database layer), so feel free to give it a good look. I’m using .NET 8, but any previous .NET version will work without any code changes. If for some reason you need to support older framework versions like .NET Core App 2+ or .NET Framework 4.6.2+, just downgrade the nuggets to a previous versions that supports .NET Standard 2.0, like versions 2.x or 3.x, and do some small tweaks into the hosting setup.
Console application setup
Now that we have defined both models and mappings, let’s setup the console application, which is going to use Microsoft.Extensions.Hosting for an easier setup of logging, dependency injection and application settings configuration.
Start by creating a console application project and create a Program.cs file with a simple “hello world!” output.
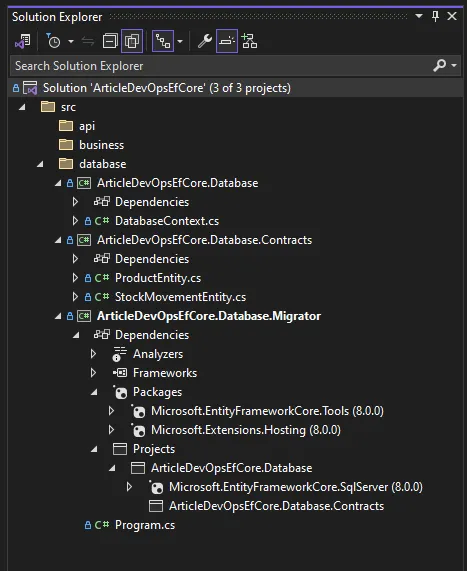
Add a project reference to the database implementation and add both Microsoft.Extensions.Hosting and Microsoft.EntityFrameworkCore.Tools packages (we are going to use Visual Studio Package Manager Console for creating the migrations, but feel free to use .NET Core CLI tools).
Inside the database layer, the projects should be similar to this:
Migrations setup
To prepare the project for creating EF Core migrations, start by adding an appsettings.json file with a connection string to an empty SQL Server database and, to be used in the future by the host, you can already make some logging configurations.
1 | { |
Remember to tell the application that, when publishing, the configuration files must be copied to the output folder. This is done by adding an include property to the csproj file.
1 | <ItemGroup> |
Create a new class implementing IDesignTimeDbContextFactory. This class will be responsible for creating and configuring the database contexts when managing migrations via .NET Core CLI tools or Visual Studio Package Manager Console.
To know which connection string must be used, we are going to use a ConfigurationBuilder to read the settings file and then register a SQL Server provider with a small detail — we must specify that the migrations are stored in the console application executable, not where the context is defined.
1 | public class DesignTimeDbContextFactory : IDesignTimeDbContextFactory<DatabaseContext> |
Let’s test the setup and see if we can create some migrations. Open the Package Manager Console and run the following command:
1 | add-migration InitialModelSetup |
If everything went as expected, a new Migrations folder was created with a InitialModelSetup migration class that will setup the database model. If your database schema is empty, it should look like this:
1 | /// <inheritdoc /> |
Hosting setup
Now that we know the project is ready to add or remove migrations based on our development database, let’s create all the required code to apply migrations when running the console.
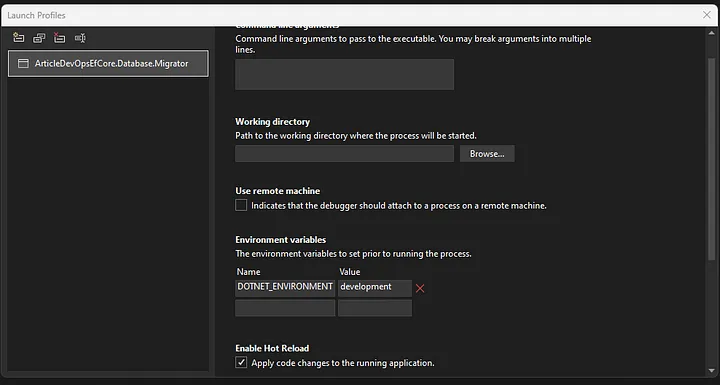
Open the launch profile, and in the environment variables, add a new DOTNET_ENVIRONMENT with the value development. This will be used by the host to know your current environment — development, stagging or production (default) — when running the application which is useful for loading different settings or executing code based on the environment, like creating test data.
Open the Program.cs file and use Host.CreateApplicationBuilder to create a builder for setting up a new host. It will use pre-configured defaults, like loading settings from the appsettings.json file or from environment variables and output logging to console and debug windows, while supporting dependency injection.
You can use the builder to register other logging providers, like NLog or Serilog, and register the Entity Framework Core context into the dependency injection container using a SQL Server provider. Because the migrations are going to be run by a console application, the context can be shared as a singleton (by default it is scoped, useful for ASP.NET Core apps), otherwise you must create a scope explicitly. Once again, don’t forget to specify the assembly were migrations are stored.
1 | var builder = Host.CreateApplicationBuilder(args); |
Create a new class named Migrator with a RunAsync method (that will have the migrator implementation), register it as a singleton into the DI container and, after creating the host, resolve and run it. Because migrations can fail, it is also a good idea to implement some exception handling logic (because even host setup can fail, I also prefer to wrap it). Also, we should support the cancellation of this process when CTRL+C or exit is requested, so let’s use a CancellationTokenSource for that.
1 | using var cts = new CancellationTokenSource(); |
Applying migrations
With the host fully configured and ready to run the migrator, let’s implement the migrations logic.
Open the Migrator.cs file and create a constructor receiving both a logger and a database context. Inside the RunAsync method add some helpful logging and use the ctx.Database.MigrateAsync to update the database schema to the latest available. Keep in mind this method will apply the missing migrations and it’s not the same as EnsureCreatedAsync, which just checks if the database exists and if it doesn’t, creates the database and schema without using any migration.
1 | public class Migrator( |
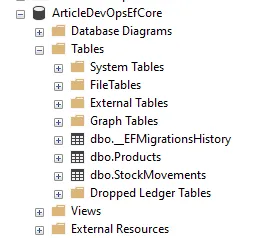
If you now run the console, you’ll see some output showing the DDL instructions that are being run and if everything went as expected the database should now list both the EF Core migration history (used to track which migrations are applied) and business tables.
Seeding data
Despite Entity Framework Core supporting data seeds when applying migrations, I think it is limited for production scenarios, like seeding different data based on environment or need to run some business logic, you will face limitations if using what EF Core offers.
To solve this problem I usually create a specialized interface for seeding data into the migrator project, so developers may implement how many seed logic they need and even decide the order by which they are run.
In the migrator project, create a new IDataSeed interface, inside a DataSeeds folder, with a SeedAsync method. As a small note, I like to pass arguments that can be used for auditing so I can use them on metadata columns, but they aren’t a requirement — just pass what makes sense to you.
1 | public interface IDataSeed |
Let’s change the migrator to run all registered seeds after applying the migrations. Open the Migrator.cs, pass a collection of data seeds to the constructor and then, inside a transaction, execute each seed one by one. I recommend to flush changes after each seed to be sure they all see the data created by each other, even if some have to execute native SQL code for performance reasons.
1 | public class Migrator( |
To test the implemented data seed logic, let’s assume we wanted to create test products for development and staging environments, but not in production. Create a new TestProductsDataSeed inside the DataSeeds folder and implement the SeedAsync method creating a bunch of products if they don’t exist and the migrator isn’t running in production.
1 | public class TestProductsDataSeed( |
Now open the Program.cs file and register the TestProductsDataSeed as a singleton. As a note, you can scan the assembly for classes implementing IDataSeed (with Scrutor, for example) but the order or registration will define the order by which they are run, and I’m assuming that will matter, but feel free to use an approach that works for your scenario.
1 | // ... |
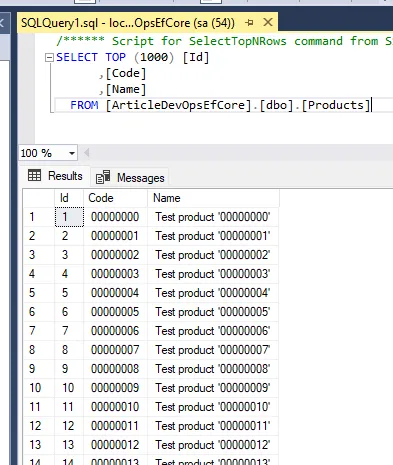
If we now run the migrator the products table should have test data.
Conclusion
In this article I explained how DevOps processes can be simplified by implementing a console application that knows how to apply Entity Framework Core migrations and seed initial data to a database, to be introduced into de Continuous Delivery pipeline.
The implementation using Microsoft.Extensions.Hosting is very straightforward and simple while providing a more tight integration against the model definitions and with improved logging, so it certainly is an approach to consider.
Even with small tweaks, in can be improved to whatever scenarios you may face, like forcing a backup before applying the migrations and reverting to it if something fails, perfect for on-prem solutions.
Once again, I have a working example on GitHub, so feel free to give it a good look.